Sunday, June 21, 2015


May Fly Tying Forum
By
Brian Garringer

The May fly tying forum at the John E. Pechmann Center, in Fayetteville NC, was lead by two of the Project Healing Water Fly Fishing volunteers, Craig Person and Terrance Straiter. 

            Craig started the session with a terrestrial pattern.  This pattern was a bee.  While the pattern itself was simple, there were some new skills required to complete it.  It started out as many craft foam pattern do by tying the foam to the top of the hook.  It then moves to using CDC as dubbing.  He split the thread and inserted the CDC fibers in the opening.  This can be even more difficult than it sounds.  First, to split the thread, spins it counterclockwise.  This loosens the individual fibers that make the thread.  A fingernail or a bodkin can be inserted between the threads to create an opening in the thread.  

            Splitting the thread is only half off the battle; you also have to get the CDC into the open in the thread.  This can be done is two way.  One way is to prep the CDC feather prior to splitting the thread.  Place a large binder clip on the edge of the CDC fibers.  Then trim the fibers off the stem of the feather.  The clip will hold the fibers in place until they are needed.  The CDC fibers can be set aside until the thread is ready.  Once the thread is split and the CDC Fibers are inserted then the thread is pulled down to place tension on the fibers.  The tension will hold the fibers and the clip can be removed. 

            The other way does not require any prepping.  The thread is split and the CDC fibers are inserted into the opening still on the stem.  The thread is pulled down with one hand to place tension on the fibers to hold them in place.  With the other hand, the stem is trimmed away the fibers.  Once the CDC Fibers are inserted in the thread, it is then spun to close the opening and turn the fibers in all directions.  Once the thread has been spun, the CDC is trapped in the thread.  It is then ready to be wrapped, as normal dubbing would be.  

            This technique creates less bulk then a standard dubbing loop.  The dubbing loop is created by doubling thread over.  The fibers are then inserted between the two pieces of thread.  It can then be spun and the fibers would be trapped in the thread   While it is easier in technique and not as time consuming to prepare.  It uses twice the thread.  In small to ultra small flies this added bulk that can be anywhere from a nuance to a disaster. 

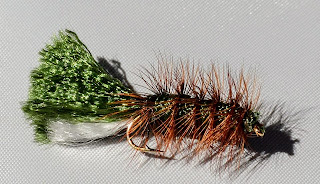
            The second fly of the evening was a Modified Woolly Bugger taught by Terrence Straiter.  This fly was modified to all natural fibers.  Terence traded the chenille that was normally used to form the body for all natural materials.  He used two different materials to form the body.  The first was white fisherman’s wool yarn.  This was tied in and wrapped just as the chenille would be. 

            The second material was alpaca fur.  An alpaca is am animal that is similar to a lama.  Its fur is harvested and used to make wool.  For the body Terence used loosed fur it was applied to thread as a dubbing. 

            In addition to the wool and alpaca bodies, he also changed the bead.  Many manufactures of flies will place a bead to provide additional weight and flash.  He placed a glass bead to provide flash. 

            These two flies were well taught and provided a success evening if fly tying.  Fly trying forums are held on the fourth Thursday of the  month.  Check out the this programs and others at the John E. Pechmann Fishing Education Center website.  http://www.ncwildlife.org/Learning/EducationCenters/Pechmann/EventRegistration.aspx.
 

Saturday, May 9, 2015

The Para Cord Flies
By
Brian Garringer

     Anyone who has served in the military knows about parachute cord.  Often referred to as 550 cord or Paracord, it has as many uses as duct tape.  It can be used for everything from securing gear in place, to securing a sunshade.  It is even used to make items such as lanyards, belts, dog leashes, and key chains.  Like duct tape, the uses of paracord is only limited by the users abilities.

     Capt. Michael Seminelli, (known as Mike to the members of the Fayetteville Project healing water) has come up with a new use for Paracord.  He uses it to tie flies.  He debuted his creations, the Tactical Para-Bugger and  Airborne Adams, at the April Fly Tying Forum hosted at the John E. Pechmann Fishing Center in Fayetteville, NC. 

The Tactical Para-Bugger
     These two flies utilize all parts of paracord to form the fly.  The Tactical Para-bugger is spin on the wooly bugger.  The Para-bugger uses the braided sheath to replace the chenille that is used to form the body and the marabou that is used to form the tail. A portion of the sheath is un breaded with a piece of Velcro.  It is then slide over the hook.  The loose threads form the Parabou tail while the braided section forms the body.  The Tactical Para Bugger does not have much a resemblance to the Woolly Bugger.  It does have a similar action in the water.

The Airborne Adams
     The Airborne Adams, a variation of the Parachute Adams, uses thread from the braided sheath to form the body and the “guts” to form the post.  The Airborne Adam is very similar to Parachute Adams in appearance and action.  Only a closer inspection shows the differences. 

     He has not completed the Para fly family yet.  He is currently working on several other patterns.  He has  tied a “Freefall Minnow.  This pattern is designed to simulate a baitfish.  There are also wet flies, and nymph patterns he is working on.  There is even a crawdad pattern in the works. 

     While Mike is the creator of the paracord flies. He did not think of it on his own.  Bert Kinkead, a member of the Fayetteville Project Healing Water,  original suggested the use of Para cord.  He suggested that a signature fly be created using paracord to represent the Airborne culture that is so closely tied to Fort Bragg.  He then began using the term Parabou, a spin on marabou, to describe the tail of the flies.

     Mike has been tying his own flies for about 2 ½ years.  It has helped him to improve his level of knowledge on fish behavior.  This in turn has improved his skills on the water. 

     His favorite fish to chase is the Wild Trout in the medium to small rivers and streams.  It does not matter which one, small brookies to the huge brown and rainbow trout.  As long as they are wild.  Wild trout are harder to catch because they are so wary and aware of the surroundings.  They also tend to fight hard to escape.  He also enjoys chasing bluegill.  To land a large bluegill on a 3 weight rod takes some skill.

     Currently he is getting ready to transition into a instructor position teaching freshman math at the US Military Academy where he graduated in 2005. 

Sunday, December 28, 2014

Like all types of fishing, it is as simple or as complicated as you want it to be.  To start catching fish there are 7 items that you have to have with you on the water.  These 7 items are

1)      A matching rod, reel, and line

a)      Your rod selection should be based on what you are targeting and the amount of time you spend fishing. General recommendation

i)        For Mountain trout a 4wt or 5wt.  On smaller streams or streams with lots of overhead cover a shorter(7 ½ to 8 ½ )  4wt rod can  make casting a little easier. 

ii)       For Bream and Bass a 5wt, 6wt, or 7wt are great options.  The 5wt is great for casting small to medium poppers and flies to bream and bass.  To cast the bigger flies to the large bucket mouths, a 6wt or 7wt are a better option.

iii)     7 wt or 8wt  is a good options for saltwater species such as puppy drum and sea trout

2)      Flies

a)      The selection of flies a person needs to stock is vast and based on the targets species.  There is no way to determine which flies will be best, however there are a couple that I also like to carry regardless of what I am fishing for. They are the Woolly Bugger and the San Juan Worm. 

i)        The woolly bugger is one of the most versatile patterns.  This pattern can imitate a large variety of aquatic animals such as Crayfish or baitfish.  It can be tied in any color with the traditional colors (and what I favor) are black and olive. 

ii)       All bodies of water have aquatic worms.  This is why earthworms and mealworms work so well.  The San Juan worm was created for the San Juan River in New Mexico.  It is such an effective pattern that it has been fished in almost every body of water.  These 1 ½  to 3’ long  worms  can be tied in any color.  The popular color is red for the bloodworms.  Brown and purple are also great colors to have.

b)      ADDITIONAL NOTE: The use of barbless hooks helps the fish and you.  A barbless does minimal damage and allows for easy release. 

3)      A Case To Hold Your Extra Flies

a)      A case serves two purposes:

i)        It transports the flies without  imbedding a hook in your body (an additional reason to use barbless hooks) and;
ii)       protects the  flies from damage
b)      The case doesn’t have to be expensive or big.  I do a lot of impromptu kayak fishing in the 110 acre lake behind our house.  The case that I use the most is an Altoid tin with strips of craft foam glued to it.  This case can hold a variety of flies and can be slid into a shirt or pants pocket easily.

c)       The only wrong fly box is the one that does not work for you.  I have a variety of boxes that range from my homemade Altoid tin, a GNC pill divider, to bass pro boxes.


4)      Tapered Leaders

a)      Tapered leaders have three sections: the butt, the taper, and the tippet.  The butt is the thickest part of the leader.  It attaches the leader to the fly line.  The taper is the junction that reduces the diameter of the leader to the tippet.  The tippet is where the fly is attached.  It is the thinnest part of the leader.

b)      There are two types of tapered leaders: knotted and knotless

i)        Knotless leaders are an extruded line that smoothly slims down from the butt to the tippet.

ii)       The knotted leader is multiple pieces of material tied together that get progressive smaller to form the taper and tippet.

c)       Leader size is labeled by the “X”.  There is some logic behind this system but it can get complicated.  The important thing to know is the larger the number the smaller (and weaker in lbs) the tippet.

d)      Many fly anglers may disagree with me, but tapered leaders are not always needed.  Tapered leaders are for delicate presentation that requires as little water disruption as possible such as when of a fly landing on the water or floating down stream naturally.  A length of 6 or 8 lbs mono is all that is required when throwing poppers to bream or bass.  When fishing weed beds and lily pads, I like to go up to a 15 lbs mono.  In the salt, it is possible to go even larger.

5)      Spare Tippet

a)      Every time that you change flies you will lose about 6 to 8 inches of tippet. Once the tippet is gone you can replace it with more or put on a different leader.

b)      A spare roll of tippet saves money.  Changing the leader every time the tippet runs out gets expensive.  Tying on new tippet is simple know to learn.

6)      forceps or small  long nose pliers

a)      If the fish is hooked in the corner of the mouth then these are not necessary.  But when a fish swallows a fly then these are necessary to remove it.  
b)      For smaller fish such as trout and bream, I recommend forceps.  This is because the jaws are thinner and able to reach farther into the mouth.  For the larger fish (and Flies), pliers work just fine. 

c)       A word of caution, flies are much more delicate than casting lures.  Use care when removing them so that they can be used to catch multiple fish.
7)      Nippers
a)      Nippers are important because they allow you to cut the tippet without the use of a knife.

b)      There are many types of nippers available.  A simple pair of nail trimmers works great for this.  I prefer the type that are marketed for fly fishing.  This is because they tend to come with other tools such as a post that can be used to clear head cement out of the eye of the hook.  Some even have hook sharpeners and knot tools attached.


Thursday, November 6, 2014

Choosing Your First Rod

 
Choosing your first fly rod is not a complicated task but there are somethings that you need to know.  Lets cover some of the basic information. Fly rods come in different sizes called weightsYou will see them written as 5wt or 8wtThese sizes are based on the actual weight of the line that is measured in tiny units called grainsDon’t worry; you do not have to memorize each line weight in grainsThey are pretty standardized across the board.  All you have to know is the weight that you want such as a 5wt lineThe smaller the line weight the lighter the line.  
Casting a fly rod is not like a regular spinning rod.  When casting a spinning rod you place a weighted lure on a thin line. You then use the weight of the lure to cast to a location.  Fly fishing is the complete opposite.  You place a near weightless fly on the line.  You then use the weight of the fly line to move the fly where you want it.  This requires a different casting stoke.  Casting itself is not hard but having some help you will greatly increase your effectiveness.  We will talk about the basic cast in a separate article.   
The weight of the line is used deliver the fly.  This means that the size of fly used is limited by the size of the fly line.  The heavier the fly, the larger the fly that can be cast.  With these facts in mind let’s look at the different line weights and their general uses:  
Weights 1-3 are designed for extra small trout and panfish. I consider it a specialty line.  They work well for super delicate presentation on small creeks and streams. These rods can use a fly size 12 on down.  
The 4 Wt rods are going to be the first practical rod. This is a good trout rod.  It can also be used for bream on the local farm pond.  This rod can use flies sizes 10-26. 
The 5wt rod is the most common and my go-to rod for smaller fish. It is a good trout rod but also works well with bream and small to medium bass.  This is the rod that most starter kits are based on.  The down side to this rod is the sizes of fly that are used (more on this later).  This was my first rod.  This rod can use flies sizes 8-24. 
The 6wt is a beefed-up 5 wt.  This will handle all but the large bass and small salmon.  This is the largest rod that I would use for trout.  It’s a bit large for small trout but great for the larger browns.  It is a bit too large for bream.  This rod can use flies sizes 6-20. 
The 7wt is a good bass rod.  It also can be used for steelhead and small to medium salmon.  This rod can use flies sizes 4-16. 
The 8wt is the last general use rod.  It is an excellent bass rod.  It can be used to pull bass through weed bed or lily pads.  It can be used for salmon as well as being a good general saltwater rod.  It does well in the marsh and inshore fishing for speckled trout, spanish mackerel, and puppy drum.  It can also be used as a surf rod.  This rod can use flies sizes 1/0 12. 
The 9wt is more of a specialty rod.  This is the rod that I like for surf fishing.  It will handle anything that can be found in the surf including the biggest redfish and bluefish.  This rod can use flies sizes 2/0 -10. 
The 10-14wts are designed for big game fish starting with the false albacore and going on up into the marlin, tarpon and small sharks.  These rods can use flies sizes 3/0 to 4. 
When picking a fly rod I recommend a “starter kit” from a well-known brand.  These kits will generally have a rod, reel and fly line paired together based on the weight.  This means that you only have to choose the weight that matches the size and type of fish that you want to catch.   
You do not have to spend a lot of money to get a good rod, but you do not want a bargain basement rod.  The cheaper rods are generally made of fiberglass.  These rods do not provide enough action to cast the fly line well.  The action describes how the rod flexesThere are three actions types: fast, medium, and slowIn the fast action rod, only the tip (the first 30% of the rod) flexesThis makes casting easier on the person.  In the slow action rod, almost the entire rod (90% of the rod) flexes.  This makes the rod very “whippy.”  It will not cast as far as a fast action.  The medium action rod is the middle of the road.  It will cast well and still be able to fight a strong fish. A medium action is what most starter kits are based on. 
 Choosing a good quality rod will make the learn experience better.  This will have you catching fish in no time.